Pages

Friday, January 25, 2008

Men's Birthday card

Pin It
guess who's been playing today! Ive been so excited to get my new cuttlebug machine and now some spellbinder nestability dies from Bizzy Becs for all you aussie Girls. I was most of the way through cleaning my craft space and these new toys kept looking at me. So once i had enough clean space out came eveything again! i wonder sometimes will it ever be clean! LOL. Anyway i had fun ....maybe ill reclean it now its a little out of my system... mabye. hehehe. Dose everyone have this problem?
Heres a pic of the Men's birthday card i ended up making and my new toys of course.
Happy sabbath and Happy Australia Day...Valita


and a last thought

Create in me a new clean heart,
Oh God, filled with clean thoughts
and desires.
Psalms 51:10

Thursday, January 24, 2008

Heart Box

Pin It
Hi all, The suns out today and the pool was great. ive built up to 30 laps again after the tummy tuck and getting stronger. Dave and Ben brought themselves a small motor bike to play with but he wasnt impressed when it came while he was at summer camp. Oh and i forgot to tell you I got some new toys...A new cuttlebug machine and some round spellbinder nestability dies ....play time!!!
Ive been looking around and found the instructions for this cute little box on the net and tweeked it a touch to make it look like a heart. Found these yummy little heart marsh mellows to put in... mmmm well its still not valentines day so most of the hearts in this little box got eaten after i took the photo. Kids still on holidays! Heres the link for the original box instructions. they made theirs into animals which look cool too and ill put some pics bellow as to how ive changed mine. Quite easy just a few extra cuts one to the top to create the round heart shape and the other to the flaps that either stay on the outside or as i have tucked them in. And instead of putting extra card over the front to cover the flaps Ive cut them a bit shorter, cuttlebug embossed the front flaps and used my scallop scissors and hole punch to create a lace up effect. Edged it all in black ink and use those cute heart brads to to hold the inner flaps closed.

When you have all the folds done fold in half and mark a circle shape and cut. this will be the top of the box.
Now fold the box as it will be when finished folding the long flaps up the inside of the box and see where you'd like to trim them off to.

So now your box should look like this ...with the top trimed round and the flaps cut so they tuck nicely inside the box

And heres a pic of how i attached those flaps to the inside.

Well it seems like many steps for a little box but i thought I'd just show you how i changed mine. Daves home now and were off to decorate our friends house and put some welcome home banners and balloons/ streamers up. They've been on holiday's in New Zealand and we managed to get a key! going to stash some food in her fridge so she dosent have to cook for sabbath lunch.
have fun and well talk next time. Valita

and a last thought

Kind words are like honey,
enjoyable and healthful.
Proverbs 16:24

Tuesday, January 22, 2008

Heart Jewel Frame

Pin It
well good morning from my part of the world, its really cool
here today after some muggy sticky days. Beth is home from summer camp and all sung out....the cool thing is there youth band snagged another gig this time at a youth rally later in the year where 1500 young people attend.
We are so excited for them but in the mean time she will have to knuckle down to finish her yr 12 high school certificate. Ben has just gone off to teen 2 camp with his mountain bike so its a girls week at home this week.
So back to the reason for this post. I have made some patterns with the idea comming from diamond cut shapes which you could use for window cards as i have. Mine will be a birthday card for my mum which is on valentines day
but they could be used for any ocation with or without a photo or even an opening for a small box front with some clear film etc.
After finishing this card i wanted the inner point to come lower down so i modified the pattern to now come out like
this
I think it looks better. So now all you have to do is have a go at it. And if you need some help with the folds just click here to see the example folds i use.
Valita
and a last thought

Wherever your treasure is, there your
heart will also be.
Luke 12:34


Heres a pic of the above pattern used to frame a verse. This was done by Ingrid a very talented lady fron the COC forum .... love it Ingridas always thanks for sharing.

Thursday, January 17, 2008

Love Heart Banner

Pin It
Another Valentine project, this one was fun to make. I printed out the size heart i wanted and then ran them through the emboss folders. Next i used jumbo scallop scissors to create the white backings and edged all this with blank ink. I used my Slim Jim lettering dies for the word LOVE and kindy glitzed then Dimensional magiced them so they pop up. Added wings to one of the hearts and ribbons to hold it all together. Cool Hey!
I had sent my daughter Madaleine and her friend down town with a pocket full of change while i was making this and she comes in saying Mum i got bargin and youll love it ...you know we talked about getting these....and i wondered what on earth she had in the box...well 2 little eyes greeted me and 2 more were in the box. She had bought 2 mice! Gone are the days they come home with a bag of lollies. I couldnt say much but how cute they were...and yes we had talked about getting some with a spare cage and all. thank goodness school holidays are almost over or goodness only knows what she'll come home with next. so you have to see the 2 new additions to the family....they havent got names yet.

Madaleine had to text her big sister staright away to tell her. Beth is still at teen 1 Summer camp singing in the youth band. and Ben is off to teen 2 camp next week to do some serious mountain biking. Weve been doing alot of walking with the kids and our 3 dogs for exercise, its been good.
So heres some closeups of the heart Banner hope they can inspire someone...Valita


and a last thought

O Lord the earth is full of your creatures,
and in wisdom you have made them all!.
The earth is full of your riches.
Psalms 104:24

Monday, January 14, 2008

Sizzix Paper Roses

Pin It
Hi all, Ive not long had this great sizzix die set called Flower Layers (got it at a bargin price on ebay) and was thinking it would make a great paper rose. So this is what ive come up with.

You will need:

Red & Green card stock
Flower layers die
leaf die (cuttlebug)
sun punh
Bamboo Skewer stick
Green artline texta
Black ink pad
red kindy glitz
Strong craft glue


This is the flower die set
Each rose only take the one set of flowers. you'll also need to punch a green large sun and leaf. Lightly edge the flowers and leaf with black ink .

Next prepare your bamboo skewer by colouring it with the green artline texta.

cut a wedge from each flower ( I cut 1 whole petal out) but the smallest( it's just cut into the center), trun over so your now working on the back. Using a large ended shaping tool on a soft pad push all around each flower to give a nice petal shape.

Taking the smallest flower apply some glue to the stick and roll this aorund....sorry the pic could of been better...

Each layer from small to big now gets wraped around the stick overlaped and glued in this way .
(pic below) make sure you are now working so the inked side is facing up. Hold for a few mins. till the glue dries and roll back each petal . I use a pricking needle or you could use a tooth pick etc...


second and third layers

After the largest and last flower is glued and petals curled cut a 2 rayed wedge out of the green sun turn your flower over and add some glue to the base of the flower. Wrap around pinching in for a sec to let the glue take hold.

make a fold down the center of the leaf and Roll part way round the stick and glue...as in the pic.

Lastly decorate with some red kindy glitz and a small heart gel sticker.

Add a tag ( I used the sizzix bread tag dies becaue they just clip on easy) and ran one through the cuttlebug emboss folder adding some ribbon. Now wrap in some pretty clear cellophane and give it to a loved one.

These are really easy to make and dont take long. I hope i have inspired you to use those dies in yet another way....Valita

And a last thought

The grass withers, the flowers fade,
But the word of our God shall stand forever.
Isaiah 40:8

Friday, January 11, 2008

You paint my world

Pin It

Thought of this valentine card idea last night while listening to Dave push out some ZZZs and had to give it a go today. I like how it turned out and its another use for those cute little paint rollers shown here.
I also used my new set of snap stamps which are great to put any words or sentence together that you may not have already as a premade stamp.
Well enjoy your day and ill talk again soon. Valita


and a last thought


For God loved the world so much
that He gave His only Son
So that anyone who believes in Hin
shall not perish but have eternal life.
John 3:16

Thursday, January 10, 2008

First of my Valentine projects

Pin It
Hi all, well here is the first of my Valentine projects. It's was subitted as a challenge in the iris folding section of cricle of crafters and the pattern was made by a talented man called Larry...good to see a few men enjoy this craft. Valentine for me is a speacial day because its also my Mum's birthday and my uncle Col's birthday (great guy). But i also have a few more ideas up my sleve for valentines so keep checking back.

and a last thought
Love is very patient and kind, never
jealous of envious, never boastful of proud
1 Corinthians 13:4

A lesson we all need to keep learning....Valita

Tuesday, January 8, 2008

Examples of the Fold Types I use

Pin It
In the posts ahead you'll need to know what some of the fold types are that i use in my patterns. I don't like to call them Iris Folding because they are not the traditional IF way of doing things. I first had the thoughts for these folds when i was wondering how on earth i could make my IF cards look more real and I am the original creater of the corner fold concept. This was back in 2006 and I then presented my ideas on the circle of crafters forum
Scince them many other people have used my folding idea to create a more pleasing to the eye twist on Iris Folding cards. Here I've taken a pic of the folds i use.


The regular and double folds are the original Iris Folding folds. Corner folds are the ones ive created. So for example if you have a shape like this you would cut paper to cover
this area plus excess for the folding.

Fold along one side of your paper and lay
on the first line ....i like to choose the longest first.


Next make the second fold following the pattern line.

and same with the third.


There are many different ways to use this according to each different pattern. So i hope this will help as the months go by and i show you different patterns and things to make.

And a last thought
If his hands are idle, the house leaks.
Ecclesiastes 10:18

Happy Australia Day - card patterns

Pin It


Well January is fast moving and the 26th brings Australia day for all us Aussies. A great day to spend as a family, having a BBQ or just getting out and enjoying our beautiful contry. I've been working on these maps of Australia and thought you might like to have a go...now these could also be great for all you OS people if you'er ever down under to send a post card back home etc. ive made 3 different kinds of patterns the first is our national flag, then the Aboriginal flag ( the native people of our country) and the last is a spinoff to what we call our sunburnt country.


Read all instructions first. Cut round the out line with a craft knife and tape down to the pattern
makeing sure its the opposite way round.

folds 1-6 are red double folds which means the paper has been folded along the lenght of both sides and some of the ends have been folded too. once this is done attach doublesided tape to the back of all the folds. Do the same for folds 7-10 in white and again attach the doublesided tape. Also don't forget to put some doublesided tape in the areas marked red.

This will help hold everything sug down when you lay the blue paper over to finish the pattern.
Don't forget Tasmaina right at the bottom it's a part of Australia too. And to finish attach stars to the front using the pattern as a guide. Sorry for the fact my stars havent got the same amount of points as the flag i just dont have a punch the same. Go here if you'd like to read more on the meaning and history of our Australian Flag
and click here for the meaning of the Aboriginal flag

And a thought for today
Though i have scattered them like seeds among the nations,
still they will remember me and return again to God.

Zechariah 10:9

Saturday, January 5, 2008

Happy Birthday to Me!

Pin It
Well today was my Birthday along with my twin sister. 39...........bring on 40.
Half my day was spent in casualty at the hospital but thats a whole story in its self ...eveything seem ok now.
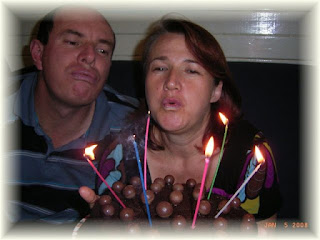
Our youngest daughter made me a nice chocolate cake with maltesers on top and we went out for dinner finishing with a cold rock icecream mmmm. Ive just started doing laps at the pool again now im off my exercise retrictions after the tummy tuck which all tied in with why i was at casualty...anyway i got a nice quicksilver towel for the pool some scrapbook magazines, prefume and 9 new cuttlebug emboss folders that are on there way...can't wait to try them. Anyone else out their with the 5th of Jan for there birthday i wish you also a great day.

I love this pic of Dave helping me!

and a thought i love
He has removed our sins as far away from us
as the east is from the west. He is like a father
to us, tender and sympathetic to those who reverence Him.
For He knows we are but dust, and that our days are few
and brief, like gress, like flowers,
blown by the wind and gone forever.
But the lovingkindness of the Lord is from
everlasting to everlasting, to those who reverence Him;
His salvation is to childrens children of those who are faithful
to His covenant and remember to obey Him.
Psalms 103:12-18